MechArtLab Infrastructure: Difference between revisions
No edit summary |
mNo edit summary |
||
| (80 intermediate revisions by 6 users not shown) | |||
| Line 1: | Line 1: | ||
[[Category:MechArtLab]] | [[Category:MechArtLab]] | ||
== | == Electronics == | ||
=== Workspace === | |||
There's around 8 electronics workstations equipped with soldering mats, irons, helping hands, side cutters, multimeters and illumination | |||
[[File:electronics_workspace.png|320px]] [[File:mechartlab_adam.png|320px]] | |||
=== Components & Tools === | |||
A reasonable amount of components and additional tools is available | |||
[[File: | <div style="display:flex; gap:1em; align-items:flex-start;"> | ||
<div> | |||
[[[[File:electronics_components.png|320px|Portrait]] | |||
</div> | |||
<div style="display:flex; flex-direction:column; gap:1em;"> | |||
[[File:more_components.png|320px|Top]] | |||
[[File:bw_oubliette.png|320px|Bottom]] | |||
</div> | |||
</div> | |||
Look / ask around in case you're looking for something specific. | |||
[[File: | === SMD collection === | ||
See a list of all our parts: https://sgmkcloud.ocloud.de/index.php/s/GmFmeziyQkk9cCM | |||
Or for nextcloud users, editable: https://sgmkcloud.ocloud.de/index.php/f/43592 | |||
[[File:photo_2025-04-21_14-11-33.jpg|400px|none]] | |||
== Mechanical Workshop == | |||
The mechanical workshop holds an array of tools and supplies, as well as a pneumatic compressor | |||
[[File:mechanical_workshop.png|320px]] [[File:workshop_reverse.png|320px]] | |||
[[File:workshop_tools.png|320px]] [[File:workshop_supplies.png|320px]] | |||
=== Crime support Dremel === | |||
To better support criminal activities, the workshop also features a Proxmox dremel device | |||
[[File:proxmox_large.png|320px]] [[File:dremel_crime.png|320px]] | |||
=== Mysterious Machine === | |||
There's a mysterious machine attached to the far wall of the mechanical workshop | |||
[[File:mysterious_machine.png|400px|none]] | |||
Your mileage may vary. | |||
== 2D Printers == | |||
=== HP LaserJet === | |||
[[File:laserjet_p3015.png|thumb|right|alt=Photo of an HP LaserJet 3015P|Our trusty 2D printing workhorse 🖨️]] | |||
* '''Location''' Next to Retro Computing area | |||
* '''Model''' HP LaserJet 3015P | |||
* '''Purpose''' Printing two-dimensional objects in black & white | |||
* '''URL''' ipp://npi0e1641.local/ (IPP) or socket://npi0e1641.local:9100 (JetDirect) | |||
* '''Toner''' HP 55A (CE255A) | |||
=== Samsung ProXpress === | |||
* '''Location''' DigiGes office | |||
* '''Model''' Samsung ProXpress M3325ND | |||
* '''Purpose''' Printing two-dimensional objects in black & white | |||
* '''URL''' Walk over and plug into USB | |||
=== ✨ Stikka Centraal ✨ === | |||
[[File:Stikka Printa.jpg|thumb|right|alt=A Brother QL550 label printer|✨ Stikka Centraal ✨: ''"Kleben und kleben lassen"'']] | |||
* '''Location''' Table near DigiGes entrance | |||
* '''Model''' Brother QL570 etc, ESP32 | |||
* '''Purpose''' Printing sticky labels in black & white | |||
* '''Features''' Label & sticker printing, generating QR code labels etc | |||
* '''Options''' Transparent or non-transparent [white | pink] sticker rolls of 62mm width | |||
* '''URL''' https://stikka-factory.github.io/stikka-mqtt | |||
[[File:Stikka Roll.jpg|thumb|right|alt=A Brother QL550 label printer with its cover open, showing the handle used to change label rolls|Stikka Printa: Upskirt shot 😍]] | |||
==== Caveats ==== | |||
* The non-transparent paper labels don't come off easily. After peeling off parts of it, you might have to use a solvent or duct tape to completely remove the remains. | |||
==== Changing supplies ==== | |||
* Open the cover | |||
* Pull orange lever up | |||
* Remove previous roll | |||
* Insert new roll | |||
* Feed new roll through front feeder | |||
* Push orange lever back down | |||
* Close cover | |||
==== Debugging ==== | |||
* The software sometimes chokes on large, high-frequency print jobs, and no more stikkas are coming through. In that case, the easiest is to briefly power-cycle the Raspberry controlling Stikka Printa. | |||
* If Stikka Printa isn't accessible on the known URL, the Raspberry controlling it might not be turned on, could have gotten a new IP from DHCP, or init5.ch DNS could be broken. Start by ensuring both the Raspberry and Brother QL550 are turned on, and scanning the BW network range for port 8980 using something like: nmap -sS -p 8980 --open -oG - 10.168.0.0/24. Once recovered, please print a new QR label in case the URL has changed, and update the link in this Wiki 🙏 | |||
==== Software ==== | |||
* If you'd like to add or improve a feature, the Stikka Printa source code can be found on [https://github.com/5shekel/printit GitHub] | |||
* To access Stikka Printa via SSH, use l: dusjagr p: clubmate42 | |||
== 3D Printers == | |||
Best to directly connect to OctoPrint: http://octopi.local/ or install Cura on your laptop and use the SD cards reader. | |||
<table> | |||
<tr> | |||
<th>[[Ender3]]</th><th>[[Ender3 v2]]</th><th>[[MicroDelta]]</th><th>Ultimaker</th> | |||
</tr> | |||
<tr> | |||
<td>[[File:Ender3_MechArtLab.jpg|x500px]]</td> | |||
<td>[[File:Ender3_v2.jpg|x500px]]</td> | |||
<td>[[File:IMG 0083.jpg|x500px]]</td> | |||
<td>[[File:8870471861 c28d68fa6d.jpg|x500px]]</td> | |||
</tr> | |||
</table> | |||
=== Bed leveling for Ender 3 (& V2) === | |||
Check this movie: https://www.youtube.com/watch?v=4JSa_r8xgX8 | |||
=== Other resources === | |||
Currently a [[MicroDelta]] printer is installed, use the page linked to get started. | |||
Design: Download Sketchup from [http://www.sketchup.com/ http://www.sketchup.com/] => Design => Export .STL | |||
Slice: Download Cura from [http://software.ultimaker.com/ http://software.ultimaker.com/] => Load .STL => Prepare => Write .GCODE to SD card | |||
Print: Insert SD card into Ultimaker => Push, Scroll to Card => Select .GCODE => Push | |||
Share: Upload model and .STL (but not .GCODE) to [http://thingiverse.com/ http://thingiverse.com/] | |||
First time? Ask [http://twitter.com/tamberg @tamberg]. | |||
== Laser Cutters == | |||
There's a public MacBook with [https://lightburnsoftware.com/LightBurn LightBurn] preinstalled and configured for our laser cutter armada | |||
[[File:laser_macbook.png|400px]] | |||
=== Creality Falcon A1 Pro === | |||
[[File:falcon_exhaust.png|200px|thumb|right]] | |||
==== Specifications ==== | |||
* 20W blue diode laser | |||
* 2W infrared module for glass and metal, at 455±5 nm wavelength | |||
* Engraving area: 358 × 268mm | |||
* Max. Working Speed: 600mm/s | |||
* Cuts up to: 10mm basswood, 8mm black acrylic or 0.04mm stainless sheet | |||
* For full specs, see [https://www.creality.com/products/falcon-a1-pro-20w vendor website] | |||
==== General usage ==== | |||
[[File:falcon_vali.png|200px|thumb|right]] | |||
* Ensure the compressor in the wood workshop is turned on ☝️ | |||
* Place the exhaust hose through the window | |||
* Ensure the devices tubular lock is in the unlocked position | |||
* Ensure power switch is in in the ON position | |||
* Unlock the Emergency Stop by turning the knob | |||
* Connect LightBurn via USB-C and laser away ⚡ | |||
==== Known quirks ==== | |||
* The devices touch display turns off after a few minutes. Just touch it to make it shine again | |||
* Though the laser cutter comes with USB-C ports, using a USB-C to USB-C cable has been problematic | |||
* Using USB-C to USB-A cable with a USB-A-to-USB-C adapter is known to work 🫠 | |||
==== Software ==== | |||
* To operate the Falcon A1 Pro using LightBurn on your own device, see [https://wiki.creality.com/en/laser-engraver/falcon-a1-pro/lightburn-guide their Wiki] | |||
* For improved settings, use Aaron's magic [[:File:Creality Falcon A1 Pro Aa 08-2026.lbzip.zip|Girlen Core config]] ✨ | |||
=== ORTUR Laser Master 2 === | |||
[[File:ORTUR_installed.jpg|400px]] | |||
The attached computer has already LightBurn installed, it's the best software to use many different laser machines: https://www.youtube.com/watch?v=YLhbvwq_EDc | |||
You find drivers and firmware updates here: https://ortur.tech/olm2/ | |||
Hackaday wrote a few articles on mods and improvements, aswell as a nice discussion on open source hardware around the ORTUR company: https://hackaday.com/tag/ortur/ | |||
== WetLab == | |||
Use the WetLab for PCB etching and other activities involving chemicals or fluids | |||
[[File:wetlab.png|400px]] | |||
=== [[PCB Etching]] === | === [[PCB Etching]] === | ||
| Line 31: | Line 209: | ||
Instructions for [[PDMS bioelectronix]]. | Instructions for [[PDMS bioelectronix]]. | ||
=== Lasercutter for PCB stencils === | |||
[http://hardwarebreakout.com/2013/03/diy-laser-cutter-for-pcb-stencils http://hardwarebreakout.com/2013/03/diy-laser-cutter-for-pcb-stencils] | |||
== Library == | == Library == | ||
=== Book Shelves === | |||
Bitwäscherei features a couple of bookshelves containing physical books | |||
[[File:bw_bookshelf1.png|320px]] [[File:bw_bookshelf2.png|320px]] | |||
=== Online Services === | |||
Check out the online [http://www.librarything.de/catalog/SGMK Library]. Login is 'SGMK' combined with our beloved password... | |||
[[File:Solderingiseasy.jpg|320px]] | |||
Comic on soldering [[File:FullSolderComic_EN.pdf|FullSolderComic_EN.pdf]] PDF booklet. by [http://log.andie.se Andie Nordgren] | |||
[http://www.example.com link title] | |||
== Office / Public Station == | == Office / Public Station == | ||
[[File:mechartlab_office.jpg|320px]] | <table><tr> | ||
<td>[[File:mechartlab_office.jpg|320px]]</td> | |||
<td>[[File:IMG_0082.jpg|180px]]</td> | |||
</tr> | |||
</table> | |||
== Storage == | |||
The shelves for personal storage boxes are located in the hallway towards the smoking area <small>*</small> | |||
[[File:smoking_hallway.png|320px]] | |||
<small>* Feature exclusive to MechArtLab Pro subscription members</small> | |||
== PowerPoint Arena == | |||
Bitwäscherei features a large area dedicated to holding conventions and presentations | |||
[[File:bw_powerpoint_arena.png|400px]] | |||
Use at your own risk. | |||
== Chill out / Coffee == | == Chill out / Coffee == | ||
[[File: | There's a lounge with a couple of sofas, as well as a kitchen / bar area | ||
[[File:bw_chillout.png|320px]] [[File:bw_bar.png|320px]] | |||
Maybe clean up your mess up after you're done? | |||
== Refreshments == | |||
Various cold beverages are available in the two public fridges. | |||
[[File:bw_fridge1.png|320px]] [[File:bw_fridge2.png|320px]] | |||
Please use the attached TWINT QR code to pay for your purchases. | |||
== Entertainment == | |||
=== Toilet DJ === | |||
Plays random WAV files from SD card upon poweron, with randomness being a bit wonky due to seeding from a floating analog pin. | |||
{| style="border-collapse:collapse; border:0;" | |||
| style="padding:0;" | | |||
[[File:toilet_rave.jpg|320px]] | |||
| style="padding:0;" | | |||
[[File:toiletdj-amp.jpg|320px]]<br /> | |||
[[File:toiletdj-ui.jpg|320px]] | |||
|} | |||
Currently features about 100 tunes, feel free to add your own favourites! <small>*Note the file format requirements [[MechArtLab_Infrastructure#System_specs|below]].</small> | |||
==== Amplifier inputs ==== | |||
The amplifier is located on top of the flushing tank, and has three inputs: | |||
* '''Tape''' ToiletDJ | |||
* '''Tuner''' Bluetooth dongle | |||
* '''CD''' ''unassigned'' | |||
==== System specs ==== | |||
* '''Amplifier''' [https://www.radiomuseum.org/r/sintron_dynavox_cs_pa1.html Dynavox CS-PA 1] | |||
* '''Speakers''' [https://hifi-wiki.com/index.php/Grundig_Box_510 Grundig Kugelbox 510] | |||
* '''System''' Arduino Uno, [https://www.adafruit.com/product/94 Adafruit Wave Shield v1.1] | |||
* '''Storage''' 32GB SD card, FAT (MS-DOS) filesystem | |||
* '''WAV format''' Mono, 22kHz, 16-bit sampling rate | |||
* '''Repo''' [https://github.com/gand417/toiletdj GitHub] | |||
==== File conversion ==== | |||
To convert a sound file into the required format, you can use tools like ''ffmpeg'' as follows: | |||
''ffmpeg -i input.mp3 -ac 1 -ar 22050 -sample_fmt s16 output.wav'' | |||
Latest revision as of 00:21, 19 August 2026
Electronics
Workspace
There's around 8 electronics workstations equipped with soldering mats, irons, helping hands, side cutters, multimeters and illumination


Components & Tools
A reasonable amount of components and additional tools is available
[[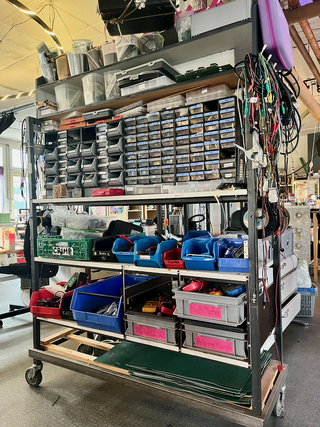


Look / ask around in case you're looking for something specific.
SMD collection
See a list of all our parts: https://sgmkcloud.ocloud.de/index.php/s/GmFmeziyQkk9cCM
Or for nextcloud users, editable: https://sgmkcloud.ocloud.de/index.php/f/43592

Mechanical Workshop
The mechanical workshop holds an array of tools and supplies, as well as a pneumatic compressor


Crime support Dremel
To better support criminal activities, the workshop also features a Proxmox dremel device


Mysterious Machine
There's a mysterious machine attached to the far wall of the mechanical workshop

Your mileage may vary.
2D Printers
HP LaserJet

- Location Next to Retro Computing area
- Model HP LaserJet 3015P
- Purpose Printing two-dimensional objects in black & white
- URL ipp://npi0e1641.local/ (IPP) or socket://npi0e1641.local:9100 (JetDirect)
- Toner HP 55A (CE255A)
Samsung ProXpress
- Location DigiGes office
- Model Samsung ProXpress M3325ND
- Purpose Printing two-dimensional objects in black & white
- URL Walk over and plug into USB
✨ Stikka Centraal ✨

- Location Table near DigiGes entrance
- Model Brother QL570 etc, ESP32
- Purpose Printing sticky labels in black & white
- Features Label & sticker printing, generating QR code labels etc
- Options Transparent or non-transparent [white | pink] sticker rolls of 62mm width
- URL https://stikka-factory.github.io/stikka-mqtt

Caveats
- The non-transparent paper labels don't come off easily. After peeling off parts of it, you might have to use a solvent or duct tape to completely remove the remains.
Changing supplies
- Open the cover
- Pull orange lever up
- Remove previous roll
- Insert new roll
- Feed new roll through front feeder
- Push orange lever back down
- Close cover
Debugging
- The software sometimes chokes on large, high-frequency print jobs, and no more stikkas are coming through. In that case, the easiest is to briefly power-cycle the Raspberry controlling Stikka Printa.
- If Stikka Printa isn't accessible on the known URL, the Raspberry controlling it might not be turned on, could have gotten a new IP from DHCP, or init5.ch DNS could be broken. Start by ensuring both the Raspberry and Brother QL550 are turned on, and scanning the BW network range for port 8980 using something like: nmap -sS -p 8980 --open -oG - 10.168.0.0/24. Once recovered, please print a new QR label in case the URL has changed, and update the link in this Wiki 🙏
Software
- If you'd like to add or improve a feature, the Stikka Printa source code can be found on GitHub
- To access Stikka Printa via SSH, use l: dusjagr p: clubmate42
3D Printers
Best to directly connect to OctoPrint: http://octopi.local/ or install Cura on your laptop and use the SD cards reader.
| Ender3 | Ender3 v2 | MicroDelta | Ultimaker |
|---|---|---|---|
 |
 |
 |
 |
Bed leveling for Ender 3 (& V2)
Check this movie: https://www.youtube.com/watch?v=4JSa_r8xgX8
Other resources
Currently a MicroDelta printer is installed, use the page linked to get started.
Design: Download Sketchup from http://www.sketchup.com/ => Design => Export .STL
Slice: Download Cura from http://software.ultimaker.com/ => Load .STL => Prepare => Write .GCODE to SD card
Print: Insert SD card into Ultimaker => Push, Scroll to Card => Select .GCODE => Push
Share: Upload model and .STL (but not .GCODE) to http://thingiverse.com/
First time? Ask @tamberg.
Laser Cutters
There's a public MacBook with LightBurn preinstalled and configured for our laser cutter armada

Creality Falcon A1 Pro

Specifications
- 20W blue diode laser
- 2W infrared module for glass and metal, at 455±5 nm wavelength
- Engraving area: 358 × 268mm
- Max. Working Speed: 600mm/s
- Cuts up to: 10mm basswood, 8mm black acrylic or 0.04mm stainless sheet
- For full specs, see vendor website
General usage

- Ensure the compressor in the wood workshop is turned on ☝️
- Place the exhaust hose through the window
- Ensure the devices tubular lock is in the unlocked position
- Ensure power switch is in in the ON position
- Unlock the Emergency Stop by turning the knob
- Connect LightBurn via USB-C and laser away ⚡
Known quirks
- The devices touch display turns off after a few minutes. Just touch it to make it shine again
- Though the laser cutter comes with USB-C ports, using a USB-C to USB-C cable has been problematic
- Using USB-C to USB-A cable with a USB-A-to-USB-C adapter is known to work 🫠
Software
- To operate the Falcon A1 Pro using LightBurn on your own device, see their Wiki
- For improved settings, use Aaron's magic Girlen Core config ✨
ORTUR Laser Master 2

The attached computer has already LightBurn installed, it's the best software to use many different laser machines: https://www.youtube.com/watch?v=YLhbvwq_EDc
You find drivers and firmware updates here: https://ortur.tech/olm2/
Hackaday wrote a few articles on mods and improvements, aswell as a nice discussion on open source hardware around the ORTUR company: https://hackaday.com/tag/ortur/
WetLab
Use the WetLab for PCB etching and other activities involving chemicals or fluids

PCB Etching
Instructions on how to use the PCB etching facility can be found under PCB Etching.
Instructions for Mask design and print for custom PCBs.
Oven for Reflow and PDMS
There is a temperature sensor in the oven connected to an arduino that can be read through serial terminal. At the moment the sensor is mounted at the wrong position and shows around 40° less than the real temperature in the moddle of the oven. more about the code and connection of the temperature sensor is documented.
Instructions for reflow soldering.
Instructions for PDMS bioelectronix.
Lasercutter for PCB stencils
http://hardwarebreakout.com/2013/03/diy-laser-cutter-for-pcb-stencils
Library
Book Shelves
Bitwäscherei features a couple of bookshelves containing physical books


Online Services
Check out the online Library. Login is 'SGMK' combined with our beloved password...

Comic on soldering File:FullSolderComic EN.pdf PDF booklet. by Andie Nordgren link title
Office / Public Station
 |
 |
Storage
The shelves for personal storage boxes are located in the hallway towards the smoking area *

* Feature exclusive to MechArtLab Pro subscription members
PowerPoint Arena
Bitwäscherei features a large area dedicated to holding conventions and presentations

Use at your own risk.
Chill out / Coffee
There's a lounge with a couple of sofas, as well as a kitchen / bar area


Maybe clean up your mess up after you're done?
Refreshments
Various cold beverages are available in the two public fridges.


Please use the attached TWINT QR code to pay for your purchases.
Entertainment
Toilet DJ
Plays random WAV files from SD card upon poweron, with randomness being a bit wonky due to seeding from a floating analog pin.
|
|
|


Currently features about 100 tunes, feel free to add your own favourites! *Note the file format requirements below.
Amplifier inputs
The amplifier is located on top of the flushing tank, and has three inputs:
- Tape ToiletDJ
- Tuner Bluetooth dongle
- CD unassigned
System specs
- Amplifier Dynavox CS-PA 1
- Speakers Grundig Kugelbox 510
- System Arduino Uno, Adafruit Wave Shield v1.1
- Storage 32GB SD card, FAT (MS-DOS) filesystem
- WAV format Mono, 22kHz, 16-bit sampling rate
- Repo GitHub
File conversion
To convert a sound file into the required format, you can use tools like ffmpeg as follows:
ffmpeg -i input.mp3 -ac 1 -ar 22050 -sample_fmt s16 output.wav